How To Make Your Digital Products
Look Even Great If You’re A Design Dummy!
It has been said for decades that you should never judge a book by its cover, but that is exactly what most people do. Whether it’s a book on a shelf, a person they just met or the virtual packaging for an information product, people really do pay attention to appearance.
If you think about it, this makes sense. In a perfect world, everyone would look past cosmetic appearance and get straight to the heart of the matter. However, this is far from a perfect world. You never get a second chance to make a first impression, and your product’s image is the first impression most people will have.
You can increase sales significantly by simply presenting the best possible image for your product. With a virtual product, this is usually done with a virtual product image. This might be a 3D book cover, software box or other visual representation of the digital product.
Graphics design is one of those things most people seem to shy away from. It seems highly technical and difficult to the average person, but it’s actually a lot easier than you might think. These days, software practically does the job for you. All you need is a basic understanding of the principles of design and how the software functions.
In this report, you’re going to learn about the different types of software available for the creation of virtual product images such as book covers, software boxes, DVD cases and more.
You will also learn the basic steps you need to take in order to create your own virtual product images, including where to locate legal stock photos and how to create your image from start to finish.
Let’s get started!
What You Will Learn
- Graphics Programs
- Photoshop Add-Ons
- Virtual Product Design Packages
- Stock Photos: What You Should Know
- Putting It All Together
WANT TO KNOW A SUPER COOL SOFTWARE THAT WILL DRIVE REAL ARMY OF VISITORS ON YOUR SITE IN FRONT OF YOUR PRODUCTS – OR YOUR AFFILIATES’ OFFER?
Turn leads to more conversions today!

Graphics Programs
The first piece of the graphics puzzle is a good graphics software program. There are hundreds of these available, ranging in price from free to hundreds of dollars. If cost is a concern, you may be able to make do with less expensive alternatives; however, the more expensive packages will make it easier to create the look you’re after even if you’re a beginner.
Let’s take a look at some of the popular graphics packages.
Adobe Photoshop: http://www.photoshop.com
The most popular graphics software is Photoshop from Adobe. While there are other graphics packages out there – most of them cheaper than Photoshop – you simply won’t find the range of available add-ons for any other program. If at all possible, pick up a copy of Photoshop. There is a 30-day trial available on Adobe.com, so you can try the program for a while to see if you like it.
The main reason to purchase Photoshop is for the wide range of add-ons available. These add-ons help add flair to your designs, even if you are a very inexperienced designer.
Another great reason to purchase Photoshop is for the huge array of tutorials available. A simple check of Google or YouTube will turn up millions of tutorials for beginners and experts alike, and there are also countless books available to teach you Photoshop from basic to advanced use.
Photoshop CS2 (a version that is several years old) is also available for anyone who may have purchased a license in the past but can no longer locate the serial number. If you have purchased CS2 in the past, visit the download page and use the included serial number (found in the table beside the download link) to activate it.
http://www.adobe.com/downloads/cs2_downloads/index.html
If you want the latest version but can’t afford to shell out hundreds of dollars upfront, you can “rent” the software through Adobe’s Creative Cloud service.
http://www.adobe.com/products/creativecloud.html
This service starts at $29.99 per month if you are a student (and you must have proof of your status, such as a student ID card) or $49.99 for an individual with a one-year commitment. If you don’t want to make a one-year commitment, the cost is $74.99 per month.
This gives you access to all of Adobe’s Creative Suite products, including Photoshop CS6 and others, for a monthly price instead of paying a large amount of money upfront. You can even get a free 30-day trial, allowing you to test all of the Adobe software.
You will also have 20GB of cloud storage for your products, giving you a great way to back up your work and access it from any location on any machine. Once you install the Adobe Application Manager and log in with your Creative Cloud username and password, you can download and install any of the software on any machine.
NOTE: You can only install the software on two machines at one time using Creative Cloud. However, if you need to use your software on more than two machines, you can simple de-authorize and re-authorize machines as needed. You shouldn’t ever need to use the software on more than one machine at a given time, anyway.
GIMP: http://www.gimp.org
GIMP, which stands for The GNU Image Manipulation Program, is an alternative to Photoshop. The program is free, and it is available for almost every imaginable operating system. In fact, the source code is freely available for porting to other systems.
The main reason GIMP is less popular than Photoshop is because of the lack of add-ons. There are many add-ons available for GIMP, however existing add-ons for Photoshop will not work with GIMP, and you won’t find anywhere near the number of available add-ons you would find with Photoshop.
Fortunately, there are still a lot of good tutorials available to help you learn how to use the program. For this reason, GIMP is a good choice when used in conjunction with other software packages, such as Box Shot 3D which we’ll look at later.
CorelDRAW: http://www.corel.com
CorelDRAW is another higher-priced option, however it costs considerably less than Photoshop. CorelDRAW doesn’t have the range of available add-ons that Photoshop has, nor does it even have the same level of support as GIMP.
Perhaps the only redeeming quality of CorelDRAW is its ability to work with vectors, which makes it a good choice if you plan to do your own artwork for your product images.
Other Programs
Unfortunately, there aren’t a lot of alternatives to Photoshop for actual design work. Many of the former Photoshop competitors have removed a lot of their design capabilities, instead focusing on photo editing. For example, PaintShop Pro used to be a full-fledged design package, but has now been scaled back to be mostly useful for photographers.
There are a few online programs that allow basic image editing. You can create simple graphics with these, but they won’t give you the professional look of a rendered 3D-style graphic. In order to get that, you would have to import your graphic into another program. We’ll discuss these programs later.
Photoshop Add-Ons
There are several types of add-ons available for Photoshop that will make your job a lot easier. In fact, some of these add-ons will make it seem as though you are a graphics guru even if you are a total newbie to graphics design.
Photoshop Actions – Actions are scripts that run within Photoshop. These scripts add automation to Photoshop, allowing you to create realistic 3D style images without the need for an expensive and complex 3D program that would take years to master. These scripts range in price from free up to around $300.
Cover Action Pro: http://coveractionpro.com/index.html
Cover Action Pro has been the standard cover action script collection for years. This script package contains over 100 different action scripts, allowing you to create a wide variety of product images from books to software boxes and much more.
The Standard edition of Cover Action Pro currently costs $199, while the Extreme version costs $299. The Extreme version contains the same actions as the Standard version, but it also comes with the Bundles & Courses action pack.
Cover Action Pro is a great choice for beginners, because they provide plenty of training to help you learn how to use the scripts. Additionally, you can purchase a template package for $47 that will let you get started with little or no Photoshop experience.
Black Belt Covers: http://blackbeltcovers.com/
Black Belt Covers is a less expensive alternative to Cover Action Pro. At $97, it is about half the price of Cover Action Pro, so it is a good choice if you’re on a limited budget.
The main problems with Black Belt Covers are:
- The actions have not been updated in several years, so they appear fairly dated compared to Cover Action Pro.
- There isn’t much in the way of tutorials that teach you how to use the actions, especially compared to Cover Action Pro.
- There are fewer actions available than with Cover Action Pro.
However, the price difference definitely makes this script package worth considering.
Mockups Master: http://mockupsmaster.com/
Another great Photoshop actions package is Mockups Master. This package doesn’t have quite the range of selections that Cover Action Pro comes with, but the graphics are more up-to-date than those in Black Belt Covers.
Perhaps the best thing about Mockups Master is the price. At this time, the product is available for only $27! If you’re just looking for a basic package that will give you a quality image, Mockups Master might be a great option.
Photoshop Styles – Styles are applied to layers, and they apply decorative effects to those layers. Styles are especially useful for creating interesting text effects, making plain, boring text really pop off the page.
Text without style applied is dull and lifeless. It doesn’t attract attention. You can turn plain text into a stunning logo with the click of a mouse by using the right Photoshop style!
If you’re going to apply styles to your text, be sure to choose a style that complements the image you’re using and it easy to read. Don’t choose overly busy styles or styles that clash with the other colors in your graphic. Using the wrong style is much worse than using no style at all!
Following this text, you will find an example of text on a gradient background. On the first line, no style is applied. On the second line, a garish style that clashes with the background and is difficult to read is applied. In the last line, a clean, simple style that looks good with the background is applied.
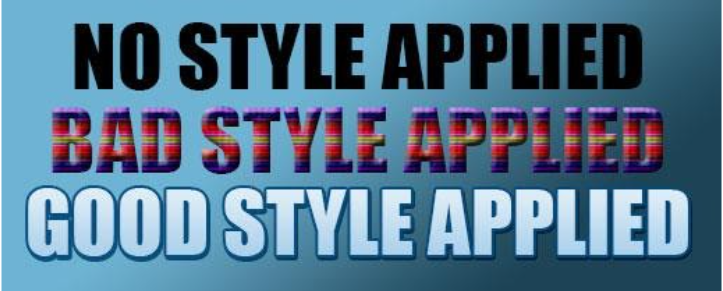
As you can see, the last line is easy to read and looks visually appealing. It stands out more than the text with the bad style applied, and it draws the eye much more than the text with no style applied.
You can download free Photoshop styles from hundreds of websites, but you should be aware that many free styles are not very attractive and may make your text difficult to read. Additionally, some styles are made for thinner fonts and others for thicker fonts, so keep that in mind as you use styles.
You can also purchase quality styles from reputable vendors. These purchased styles are often much more useful than free styles, and you can often see examples of the styles used on text before you buy.
One great place for purchasing styles (as well as other add-ons) is Graphic River. This website allows individual product creators to sell their add-ons through a single marketplace.
>> http://www.graphicriver.net
To find Photoshop styles, simply mouse over “Add-ons” in the top menu, and then click “Photoshop”. In the menu on the right side, click “Styles”. This will bring up a selection of hundreds of styles for purchase. Most packages include multiple styles focused around a similar theme, and packs are remarkably affordable. Packs start at around $2 and go up to around $20 for very large packages.
A great place to find free add-ons, including styles, is at deviantART. There are thousands of free downloads available.
Once at the deviantART website, click “Resources & Stock Images.” Click “Application Resources.” There is no section specifically for Photoshop Styles, so browse through the Photoshop .PSD section and the Photoshop Actions section to find styles, or search for “styles” within the Application Resources section.
Other Add-Ons – There are other types of add-ons available as well. For example, you can buy or download gradients, patterns, shapes, brushes and more. Each of these types of add-ons is useful in its own way. Gradients are useful for backgrounds and stylizing text. Patterns are great for adding texture to elements. Shapes are great for calling attention and crating dynamic images, as are brushes.
You can download thousands of various add-ons through Graphic River and deviantART, and there are thousands of web pages that make these elements available free. But check the terms for use and make sure they are for commercial use.
Virtual Product Design Packages
If you cannot afford Photoshop, or if you use the trial and find you don’t like it, there are other alternatives available for creating virtual product designs.
Box Shot 3D (Windows and Mac)
Box Shot 3D is a software package that is available for both Windows and Mac computers. This software allows anyone to create many different types of virtual product packaging graphics without Photoshop, because it is a standalone program. It is not a Photoshop action script as so many other virtual product design programs are.
Box Shot 3D is a 3D rendering program that allows you to take one of their premade shapes, add your own graphics to the shape, and render the shape from any angle you use. You can even customize the lighting to create exactly the look and feel you desire for your image.
Box Shot 3D is currently $80.
True Box Shot (Windows or Photoshop)
True Box Shot is a software package similar to Box Shot 3D. The standalone version (Windows only) is $55, and the Photoshop action version is $39.99, making it cheaper than Box Shot 3D.
True Box Shot doesn’t have as many options available for cover types, but if you find the right one for your product, you can save money by choosing this option over Box Shot 3D.
Stock Photos: What You Should Know
Unless you will be creating your own images or taking your own photos for your products, you will need to purchase stock photos. Legally, you cannot just take images from other websites without paying for them. Doing this could get you sued for major damages by the owner of the image.
In fact, you shouldn’t even trust most images you find online that claim to be free. You have no way of knowing whether that image is truly being posted by the owner of the image’s copyright or by someone who has illegally downloaded the image elsewhere and is reposting it.
Stock Photo Sites – Finding the right stock photo for your project is crucial. If you choose a boring photograph or piece of artwork, your entire project will be boring. No amount of graphics work can make a terrible image work well.
There are many different stock photo sites available, and most are reasonably priced. Keep in mind that the price you are paying is going, in large part, to the photographer who took the image. Most images only sell a handful of copies (or none at all) so the photographers don’t really make a lot of money. This is why stock photos may seem pricey. A good photo is well worth the expense!
Here are some of the best stock photo sites:
>> http://www.bigstockphoto.com
>> http://www.depositphotos.com
>> http://www.shutterstock.com
Be sure to read the license carefully before you buy. Some stock photo agencies may require an additional fee for certain uses, so be sure you understand your rights thoroughly before you buy.
Many stock photo agencies require you to purchase credits instead of buying individual images. This may require you to buy more than you really need. Big Stock Photo is one of the few agencies that currently allow you to buy images one at a time, so if you know you’ll only need one image, you might want to consider using them for your stock needs.
Trustworthy Sources of Free Images – There are a few sources of images that you can be relatively certain you can trust. Keep in mind that these sources may have limited selections, so you may not find what you need. Additionally, the quality will not generally be as good as with stock agencies that charge for their photos. Plus, you can never be 100% certain the images you download are legal, so use these only as a last resort.
Here are a few sources that are considered trustworthy:
>> http://commons.wikimedia.org/wiki/Main_page
>> http://www.photos-public-domain.com/
>> http://www.alegriphotos.com/
>> http://www.public-domain-photos.com/
And here is a large list of reputable sources for free photos:
>> http://en.wikipedia.org/wiki/Wikipedia:Public_domain_image_resources
Please be sure to read the site’s terms of use before you use the photos! Many sites require you to credit them or have other terms you must obey to use the images legally!
Putting It All Together
Once you’ve chosen your software, you need to put everything together to create your virtual product image. Here is a quick and easy step-by-step tutorial that will walk you through the process of creating your image.
Step 1: Choose a Product Type
The first thing you must do is chose which type of virtual product image best represents your product. This will obviously be limited by the software package you have chosen to use based on which types of product packaging they have available.
If your product is a book, you can choose a paperback or hardcover book image. If you have a software package or any type of product that is packaged as a bundle, you could use a box. If you sell audio or video, you could use a CD or DVD case.
Step 2: Choose a Stock Photo
After selecting a product type, choose a stock photo that complements both your product theme and the type of virtual product image you have chosen. Try to avoid generic images of smiling people or stacks of money.
Instead, choose something that really represents your company, your product or your product’s name.
Since the flat image will usually be quite large, choose a stock photo that is at least 3000×3000 pixels in size.
This will be a bit more expensive than a smaller image, but a smaller image will look grainy and pixelated if you try to blow it up to the size required by most cover action software.
Step 3: Create the Flat Graphic
Most cover action software comes with basic blank templates that are used to create a flat graphic for use in the final design.
Think of taking a software box and opening it up completely and flattening it out. If you fold it back up, it is a 3-dimensional product, but originally it was a flat, printed piece of cardboard.
There are hundreds of websites you can visit to get inspiration for your flat design. Sometimes looking at the work of others can give you ideas for your own work.
Remember to use these only for inspiration. Never try to copy someone else’s work!
To find good sources of inspiration, search Google or another search engine for the following:
- Ecover designer
- Book cover designer
- Minisite designer
- Ecover design
- Minisite design
These searches will give you a good starting place for finding inspiration for your work.
Step 4: Render the Virtual Product
Once the flat graphic is finished, you can use your chosen cover design package to compile the finished 3D product.
If you’re using a cover action script in Photoshop, you will simply run the action to turn your flat image into the finished product.
If you are using an external program like Box Shot 3D, refer to the software’s manual to find out the steps you need to take to compile your finished image.
Step 5: Save the Image
Don’t forget to save both the flat graphic and the compiled graphic separately as a PSD file or other format that can be edited, and then save the compiled graphic as either JPG format or PNG format.
If you’re using Photoshop, you’ll want to save your graphics as a PSD, because you can come back and edit these files later if you need to make changes or create new images using the same basic elements. Don’t forget to save both the flat graphic and compiled graphic separately!
Final Words
You’re finished!
That’s all there is to it!
Once you learn these basic steps, you will never have to pay a designer an outrageous fee to create covers for you again!

READY TO LAUNCH A SUCCESSFUL ONLINE BUSINESS WITH AFFILIATE MARKETING?
It is VERY possible to earn money while you are sleeping. And it’s even easier than you might think!
A brand new, yet very simple method is earning newbies over $125 per day.
You’re about to discover the secrets to making money in your dreams!
LEARN
COMPANY
FOLLOW US
Youtube
Facebook
Pinterest
Twitter
Instagram